
A project to create an ambient interface using LEDs to show various environmental data.
- Watch the video https://vimeo.com/aubergene/city-sunrise
- See the code https://github.com/aubergene/city-sunrise/
Background
I wanted to create a light display as a site specific installation to fit over my window, which is five metres wide. I bought a rope of 300 addressable NeoPixel LEDs and started to think about what I could sense, what I would want to know and how I might want to see it displayed.
I was inspired by Light Tower 1972-2016 by Philip Vaughan which was mounted on the roof of the Hayward Gallery from 1972 to 2016. I fondly remember seeing the work daily when I was studying at King’s College and regularly walking over Waterloo Bridge.
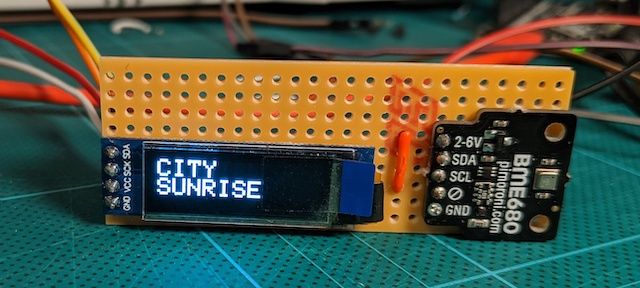
We were already using the Adafruit Metro M0 in class and so I decided to use a weather related sensor for my project and found the BME680 from Pimoroni. It returns four readings which I was interested in: temperature, humidity, air pressure and volatile organic compounds (VOC - a proxy measure for certain air pollution). I also bought a small OLED screen which I found was incredibly helpful for debugging purposes as well as a nice addition for information output. It was slightly tricky getting both the BME680 sensor and the OLED screen working since they used the same pins, but I found out it can use the I2C interface and that there are two address which can be switched by soldering closed a jumper switch on the back.
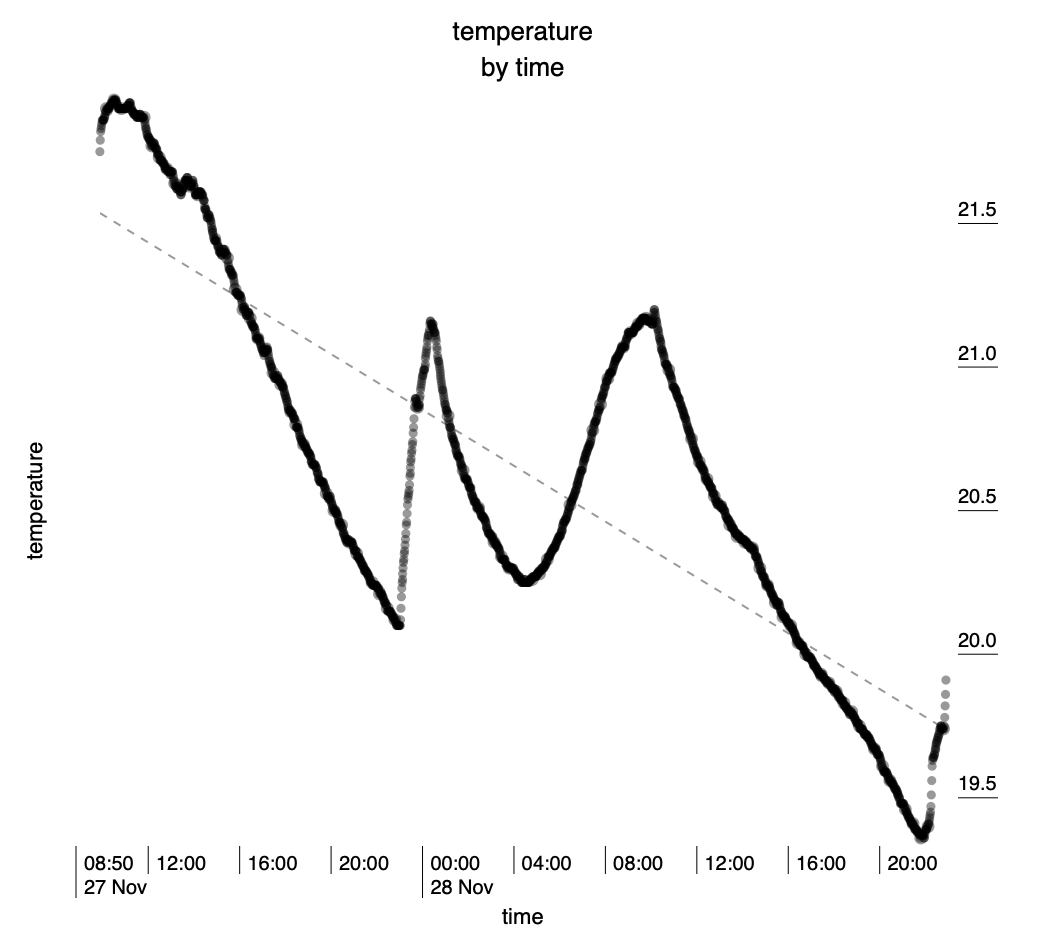
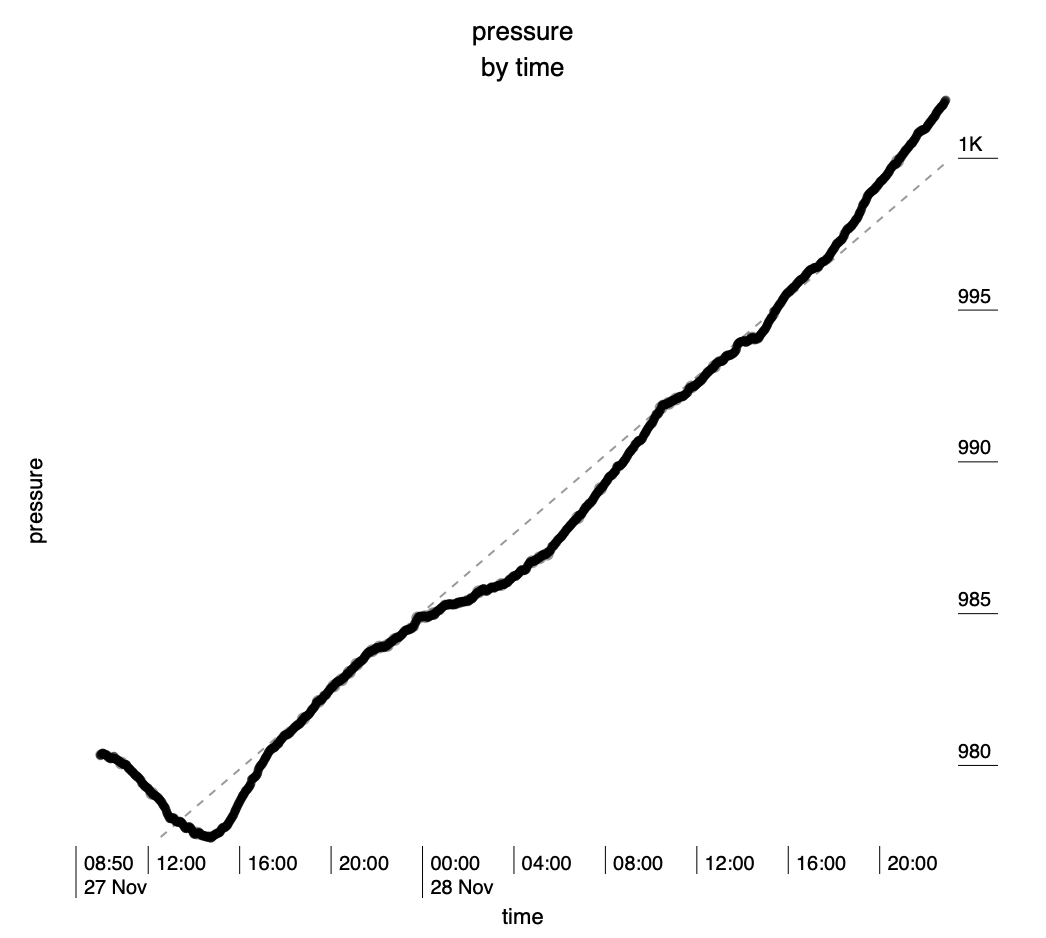
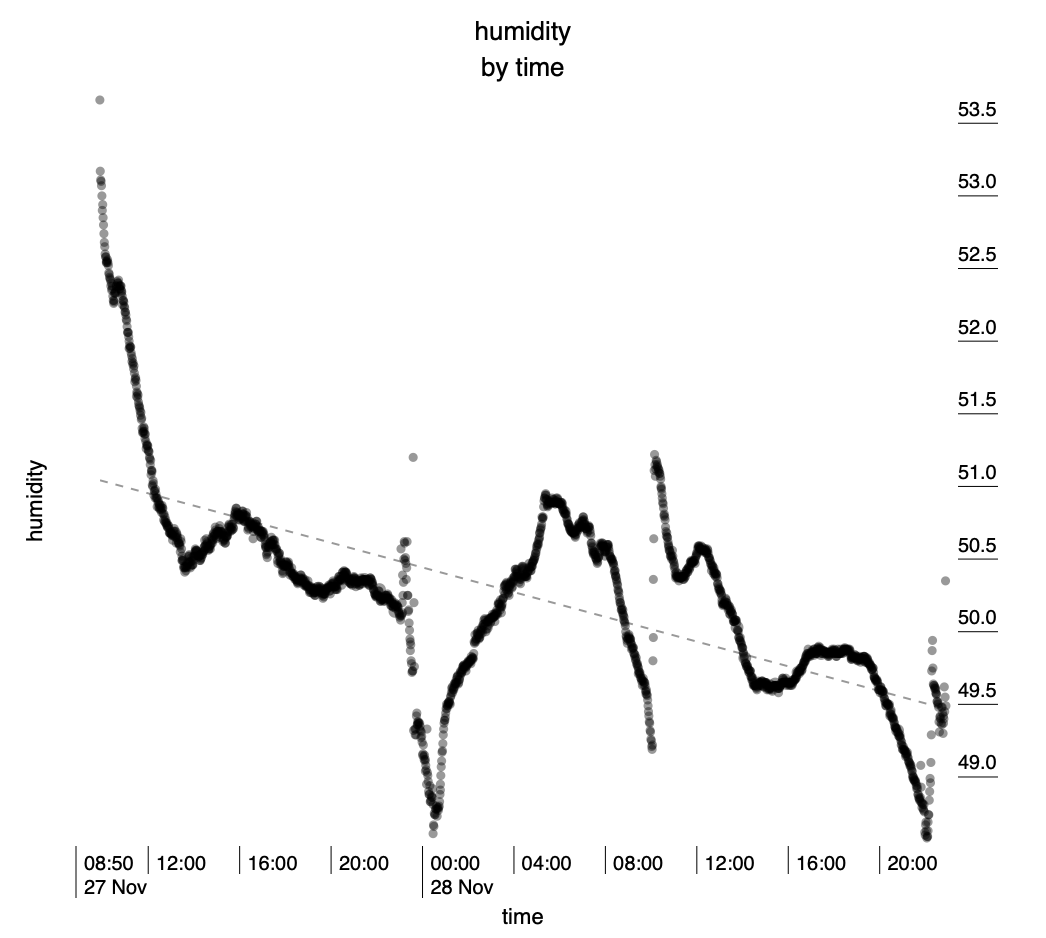
Once I had the sensor working I logged some measurements via the serial interface using a small NodeJS script. I was then able to get some idea of the range of values I could expect and the rates of change. Thinking about a strip of LEDs as output I came up with the follow ways of expressing data:
- Static colour and change of colours over time
- Movement of pixels, as individual cells, or as larger groups
- Difference in colour to neighbours
- Animation by blinking and fading pixels
- Brightness of pixels and change of brightness over time
I wrote a bunch of test scenes for the LEDs and learned how to use VS Code as an editor for Arduino code. I found it was much easier to simulate the sensor inputs using a variable resistor, and used that to cycle through the range of inputs and outputs. I used a button to switch between scenes. It was a challenge writing my code so that each scene could run and still return to the main loop to check for button pushes and the value of the variable resistor. I split my code into different header files, I'm not sure it was the best solution as there are a lot of global variables, but it made the code more manageable. If I had more time I would like to look at using C++ classes and especially creating a class which would easily allow me to do running/longer term averages of the sensor data so that I could show rates of change.
I learned that powering so many LEDs at maximum is a big technical challenge in its own right and that did cause some constraints on my ideas for how I could use the lights for output. I also would have liked to use a board which has WiFi as then I could connect to internet APIs to get weather data and predictions, however this was more complex still for coding and power as the boards seemed to only output 3.3v and I needed 5v.
Overall I'm really happy with the outcome and I would really like to continue to work on it and perhaps overcome some of the limitations I reached.
Wiring Diagram
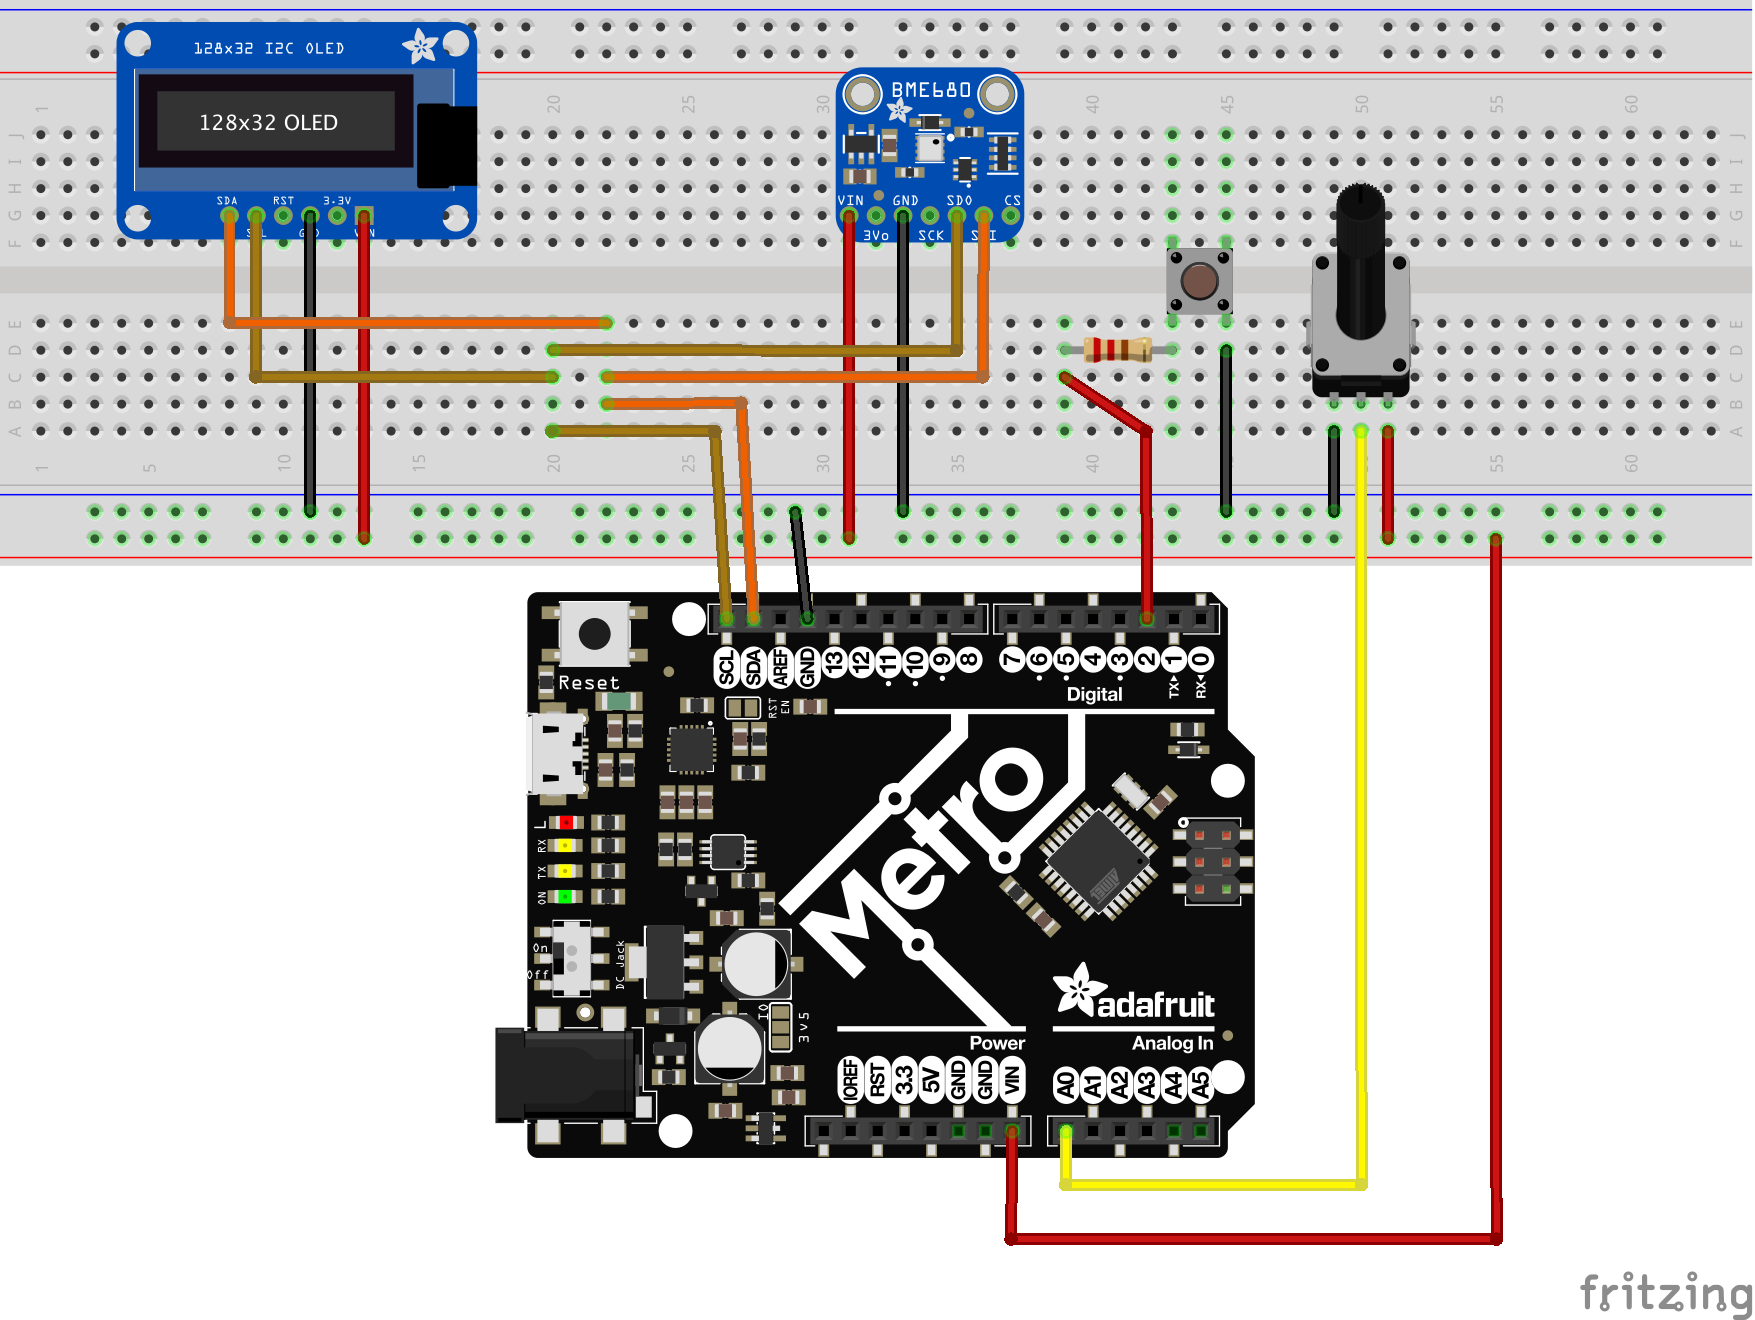
I later changed to use a rotator switch which I was unable to find in Fritzing so I still show the variable resistor
Plans for development
- Add rain sensor YL38
- Add real-time clock HW-84
- Create C++ class to track average sensor values over time
- Switch to WiFi enabled board and connect to web APIs to get weather data and forecasts
Parts list
- Adafruit Metro M0
- Adafruit BME680 Sensor - temperature, humidity, air pressure, VOC
- SSD1306 Monochrome OLED screen, 128x32 pixels
- WS2811 "NeoPixel" rope 300 pixels
- HW-040 Rotary encoder and switch
- 1000µF 6.3V capacitor
- 5V 2A DC power supply
Libraries
- FastLED - https://github.com/FastLED/FastLED
- Adafruit BME680 - https://github.com/adafruit/Adafruit_BME680
- Adafruit SSD1306 - https://github.com/adafruit/Adafruit_SSD1306
I also pasted code into my project in the following files and adapted as needed. Please see inside files for license info.
src/screen.h- Example OLEDs based on SSD1306 - Limor Fried/Ladyadasrc/rotator.h- New Rotary Encoder Debounce - by Yvan / https://Brainy-Bits.comsrc/leds.h- adapted from FastLED examplesrc/gamma8.h- found in FastLED examplessrc/button.h- adapted from http://www.arduino.cc/en/Tutorial/Debouncesrc/bme680.h- adapted Adafruit BME680 example
Notes
- Powering neopixels using levelshifter for 3.3 -> 5v https://learn.adafruit.com/neopixel-levelshifter